TallyFi Manual
The TallyFi system is designed to be simple, yet flexible. We work hard to make sure to ensure our system is as simple to use as possible yet still provide advanced options and custom solutions to meet the demands of any counting problem. This manual lays out all of the options currently available - you certainly aren't expected to need everything here to use the system, but skimming through this document will help you understand what's possible. If there is something you'd like to accomplish, but can't find here, let us know: we'd love to help you reach your goals.
If you're a new customer trying to get things setup for the first time, you should start by visiting our quick start guide.
Overview
As you could probably guess, everything about the TallyFi system is geared towards keeping an accurate and up-to-date count. This can be surprisingly complex - imagine controlling the capacity of a large building with multiple rooms, many possible points of entry, and the flow of guests from room to room. The problem boils down to keeping track of multiple related quantities. With TallyFi, we break this into two levels: "venues" and "areas":
Venues are the top level container for counts, and are composed of areas. You can create a new venue by pressing the "Add New Venue" button on the dashboard settings page.
Areas can be thought of as "rooms" or "exhibits" - they are the the smallest containers for counting people/items. The come in two flavors:
- Combined
- Taken together, all combined areas are summed to a total, called the "venue total". i.e. if the count was 10 for each of the three areas (1, 2 and 3), then the venue total is 30 (area 4 total isn't included)
- Separate
- Separate areas are not included in the venue total, and are not summed with any other room's totals. A "separate area" is the equivalent of creating another venue with only one combined area.

Devices are the mechanism for changing counts. They are always connected to areas (not venues). As you'll see in the device modes section, there many ways that the device can be configured to act on the area counts.
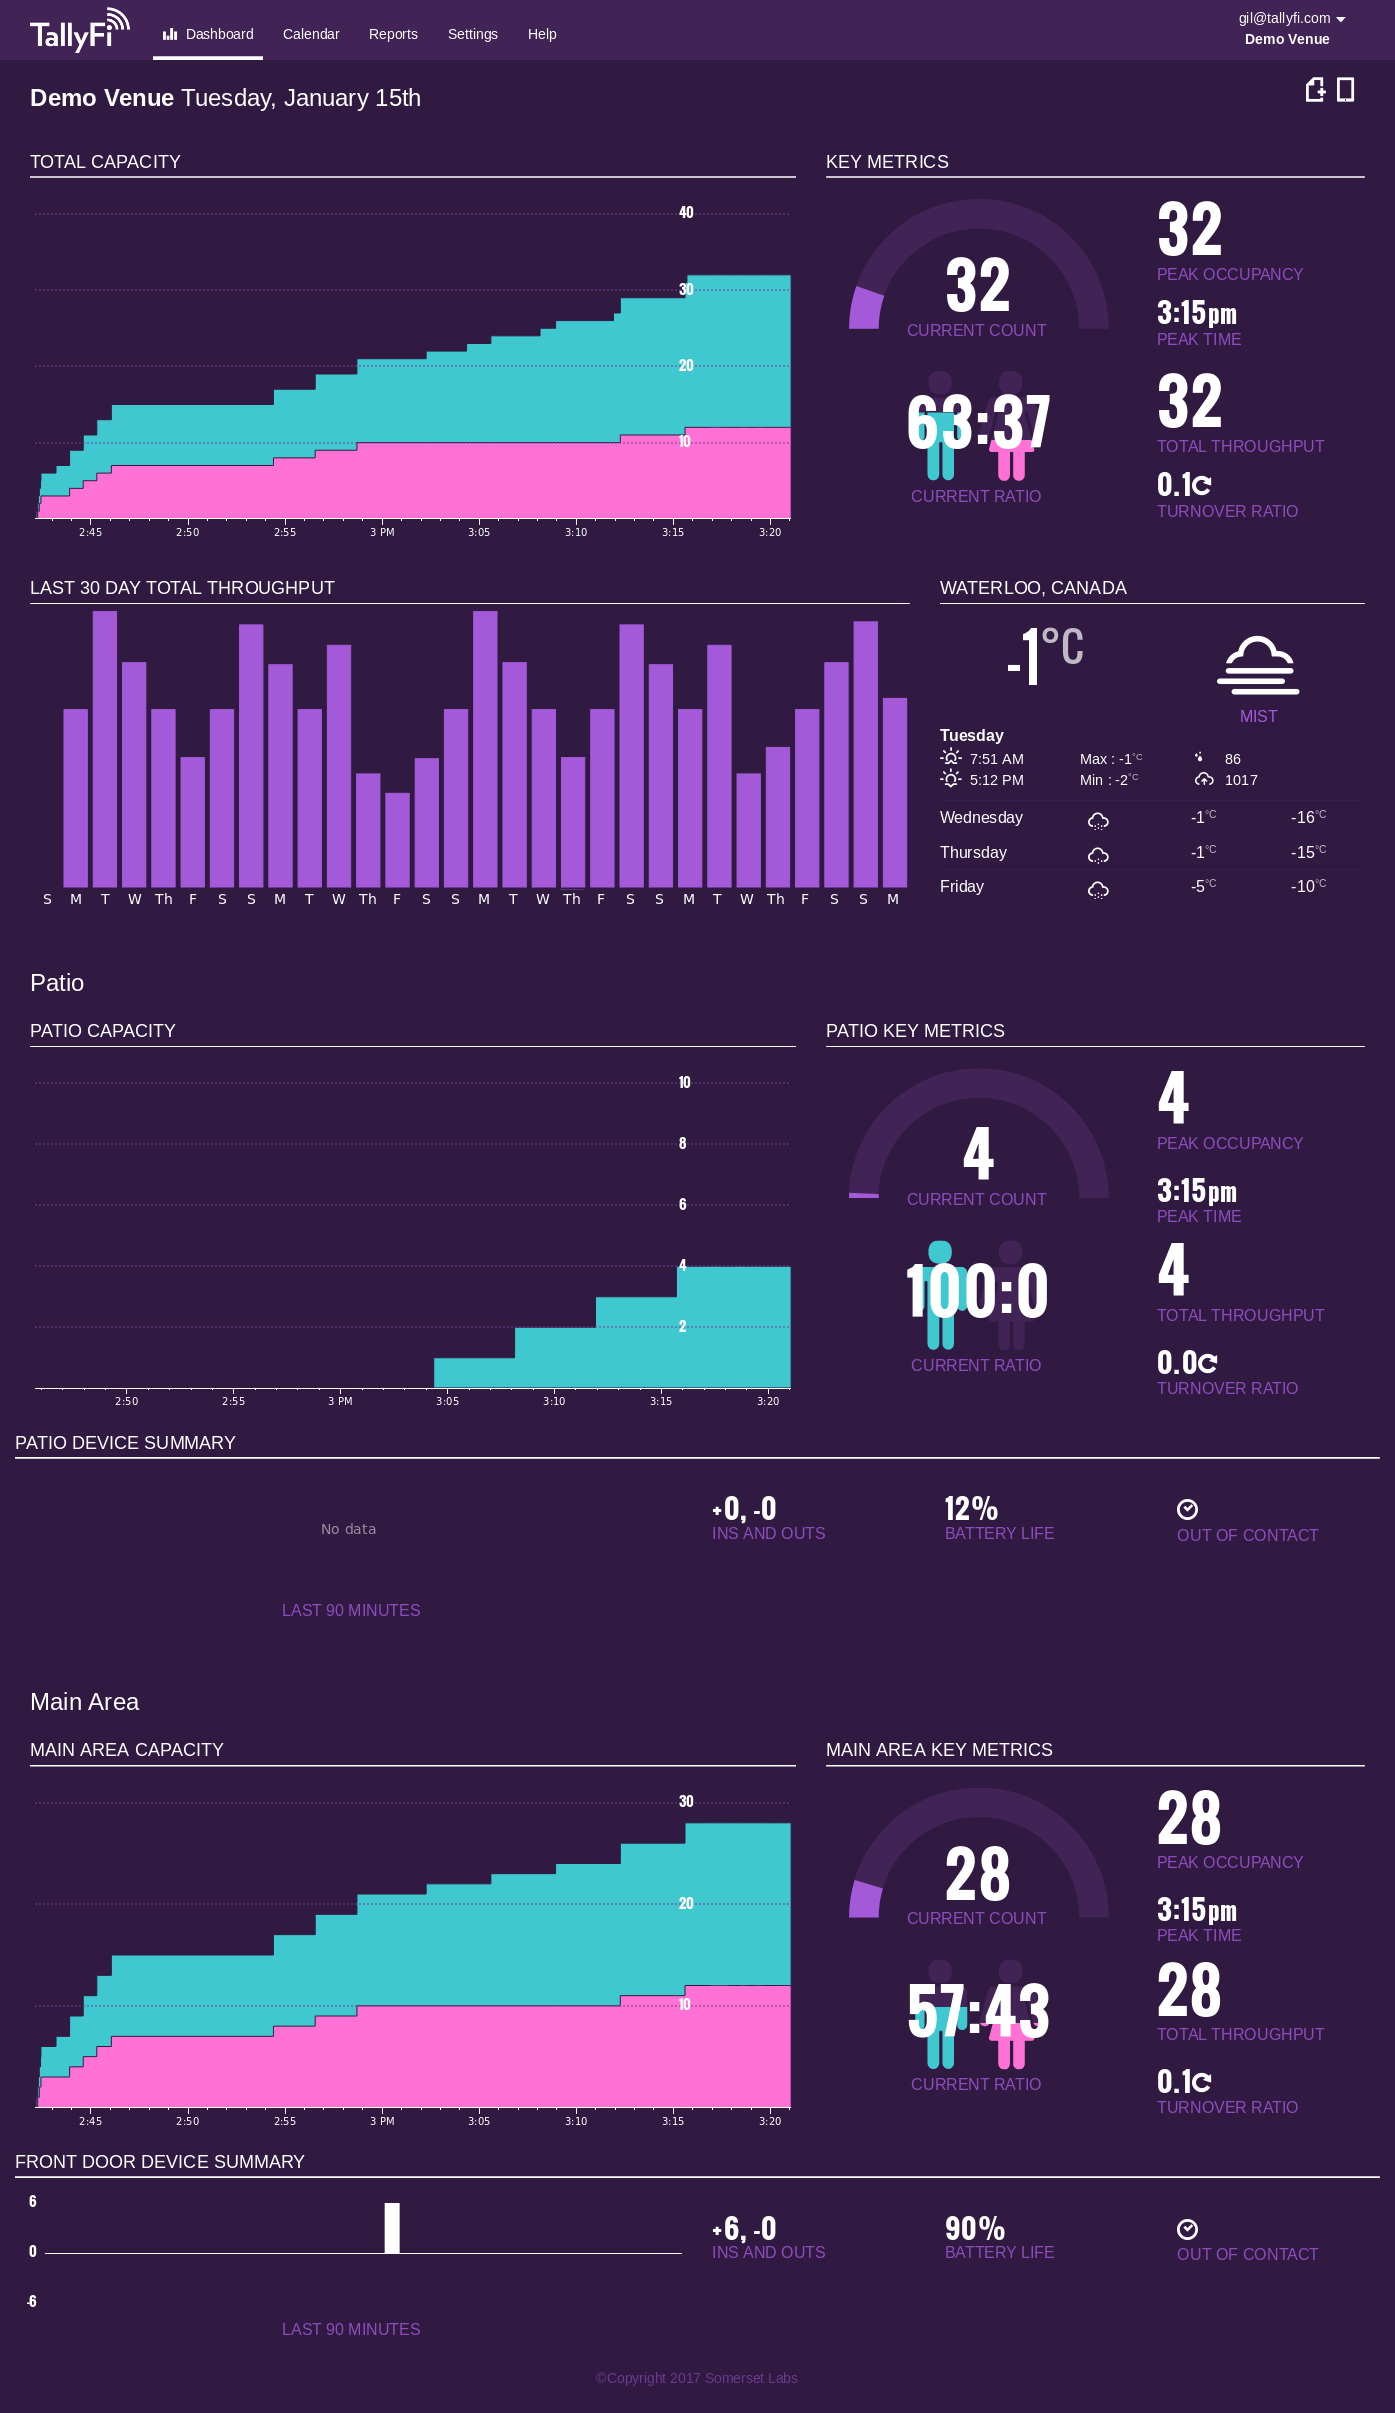
The Dashboard
After creating an account and your first venue at TallyFi.com you'll be taken to the online dashboard. This is your central hub for interacting with the service - both in terms of reviewing past data, as well as modifying the configuration of the system.
There are four main destinations available on the TallyFi online dashboard:
- Dashboard
- Provides a real-time view of the current counts for a venue, and all of its associated areas. All of the devices are listed with a summary of their last reported activity and battery level. You can switch between multiple venues using the drop down in the top right hand corner.
- Calendar
- The calendar view shows a monthly calendar with each date filled with the reported daily throughput for the venue or area selected. Clicking on any date will expand the view and give a detailed overview of performance for that specific date.
- Reports
- TallyFi generates a number of specialized views of your data to help you make use of your data. The reports tab contains the week-in-review (compare a weeks performance to the running three week average), and the daily side-by-side (compare any day within or across venues). In addition, various data export options are available here: export day summaries, or export individual count events.
- Settings
- The settings page is your hub for configuring all account, venue, and device options. From this screen you can:
- Update credit card information
- Invite other users to view/administrate particular venues
- Pair and configure TallyFi devices
- Create new venues, and edit existing ones
- Administrate licenses and email reporting
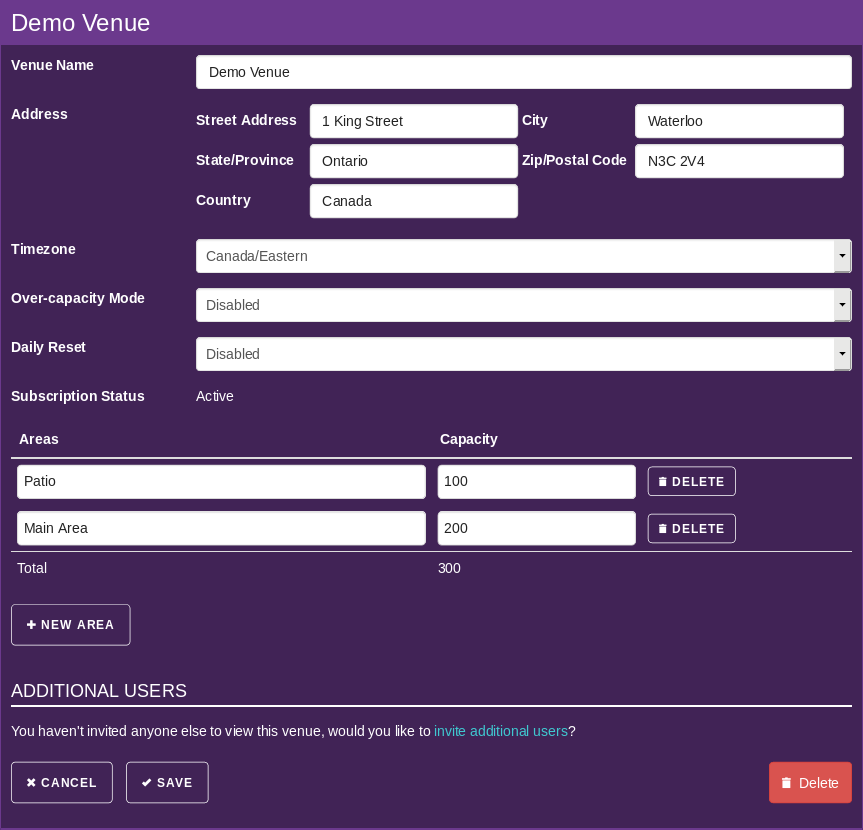
Configuring a Venue
Visiting the Settings page of the dashboard, you'll find you can edit the configuration for your venue. There are number of options here that can be used to improve the quality and usefulness of your data:
- Venue Name
- As you could probably guess, the name you choose is useful for identifying the particular venue you are looking at when you have more than one venue configured.
- Address
- The address information is used to pinpoint your venue for weather gathering purposes.
- Timezone
- The timezone selection will affect the time axis on all TallyFi charts. In addition, the venue's timezone setting is transferred to any paired device, so that the time displayed on all connected counters will be set to match the dashboard.
- Over-Capacity Mode
- All devices connected to this venue are in a special display mode where the displayed total is capped to the configured capacity. On key presses, the actual count is briefly shown before being replaced by the maximum capacity with an asterix visible on screen.
- Daily Reset
- All connected areas are automatically reset to zero at the end of the each day.
- Areas and Capacities
- This is where new areas can be created, and existed areas edited. The overall venue capacity is a calculated value based on the areas defined.
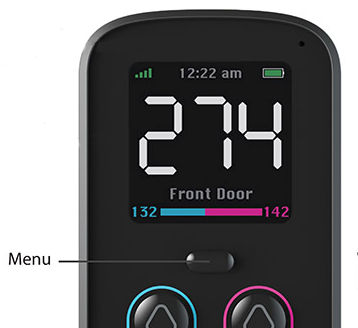
The Device (TF-2)
TallyFi counters are used to view and change the counts being tracked. They've been designed to be robust and simple to operate, allowing the operator to concentrate on their surroundings rather than on the device itself.
A quick tour of the device:
- A bright color OLED display to display the current count
- A central wake/menu button. Clicking the button to wake the screen, hold it to activate the menu
- Four count keys, generally configured to increase or decrease the count for associated areas
- A blinkbit.io sensor (rear) - used to perform quick WiFi setup (not a camera, it is incapable of capturing images)
- A reset button (rear), used as a last resort to hard-reset the device
- A vibration motor (internal) to notify the holder when certain conditions have been met (to facilitate eye-free use)
Initial setup and pairing with your account is best handled by following our quick start guide .

Communication
TallyFi devices use WiFi to communicate with each other and our central server. If real-time data is important to you, you'll want to make sure that you've got strong and reliable WiFi where each of the devices will be in use. When offline the devices will provide an on-screen warning, but will continue to operate (they will store and display all local input presses but the total won't include any count data from the other devices since the last connection).
The devices support WPA2 networks with pre-shared keys using the 802.11b/g/n standard (2.4ghz). You can configure the device to connect to multiple networks depending on signal strength, but we recommend having a single configuration in order to prevent redundant connection attempts to non-existent access points.
Captive portals are not supported. Generally the solution is to whitelist the devices by their MAC address in your access point configuration. You can find the unique MAC address in the "Advanced" -> "Device Info" menu on the device.
The TallyFi family of devices connect to port 32323-32326 on our remote server, so if your firewall is configured to filter outbound connections please be sure to whitelist that port range.
Battery Life and Charging
TF-2 devices will stand up to 7-8h of continuous use. In our experience, the best strategy is to make charging your devices a regular part of your daily routine, that way you will never be stuck with a dead device. We include a high capacity usb charger in the box with each new device, but you can use any standard usb-micro charger to charge your devices.
You can shutdown the device for long-term storage by holding down the central button. After holding the key down for a few seconds, the screen will display a countdown timer. If you continue to hold the button until the timer reaches zero, the device will shut down completely.
Device Menus
Additional functionality is accessible by holding the central wake/menu key until the settings menu appears.
- Zero Count
- Reset the count for all connected areas to zero.
- Wifi Setup
-
- Blinkbit.io
- Use the blinkbit.io sensor on the back of the device to configure WiFi.
- Access Point
- Create a private access point, which will allow you to connect directly to the TallyFi device from a phone or computer in order to configure WiFi.
- WPS button
- Some routers support push-button pairing (without password). Selecting this option will start the listening process.
- Options
-
- Brightness
- Configure the display brightness. Higher levels make the device more readable in sunlight, but does sacrifice battery longevity.
- Haptics
- Enable/Disable device vibration feedback.
- Shutdown
- Turn the device completely off, suitable for long term storage.
- Advanced
-
- Factory Reset
- Remove all settings from the device, including access point settings and device pairing.
- Device Info
- Provide detailed information about the current device, useful for providing unique information, such as the device's MAC address.
- Connectivity
- Current connection information, including IP address and currently connected access point.
- Certifications
- FCC and IC information for regulators.
Device Modes
There are a variety of different modes that can be enabled to change the appearance and functionality of the device. The most visible difference is the number of counts managed/displayed:
- Single Count Mode
- One count is displayed on screen. This is the count for the area/venue to which the device is connected, depending on the variation selected.
- Split Mode
- In all split modes, two separate counts are displayed. In some configurations the two counts may come from two separate areas, or relate to different aspects of device operation.
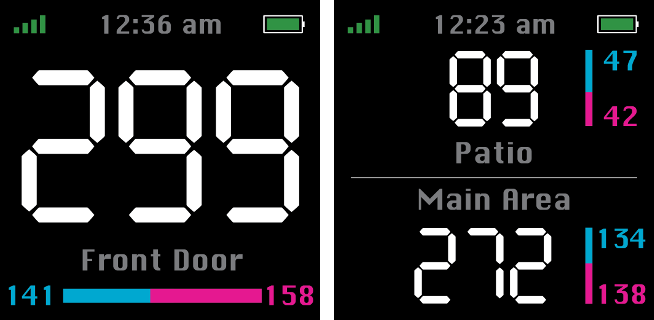
Keeping those two bits of terminology in mind, we'll explore a number of variants that are possible based on the number of areas the device is paired with:
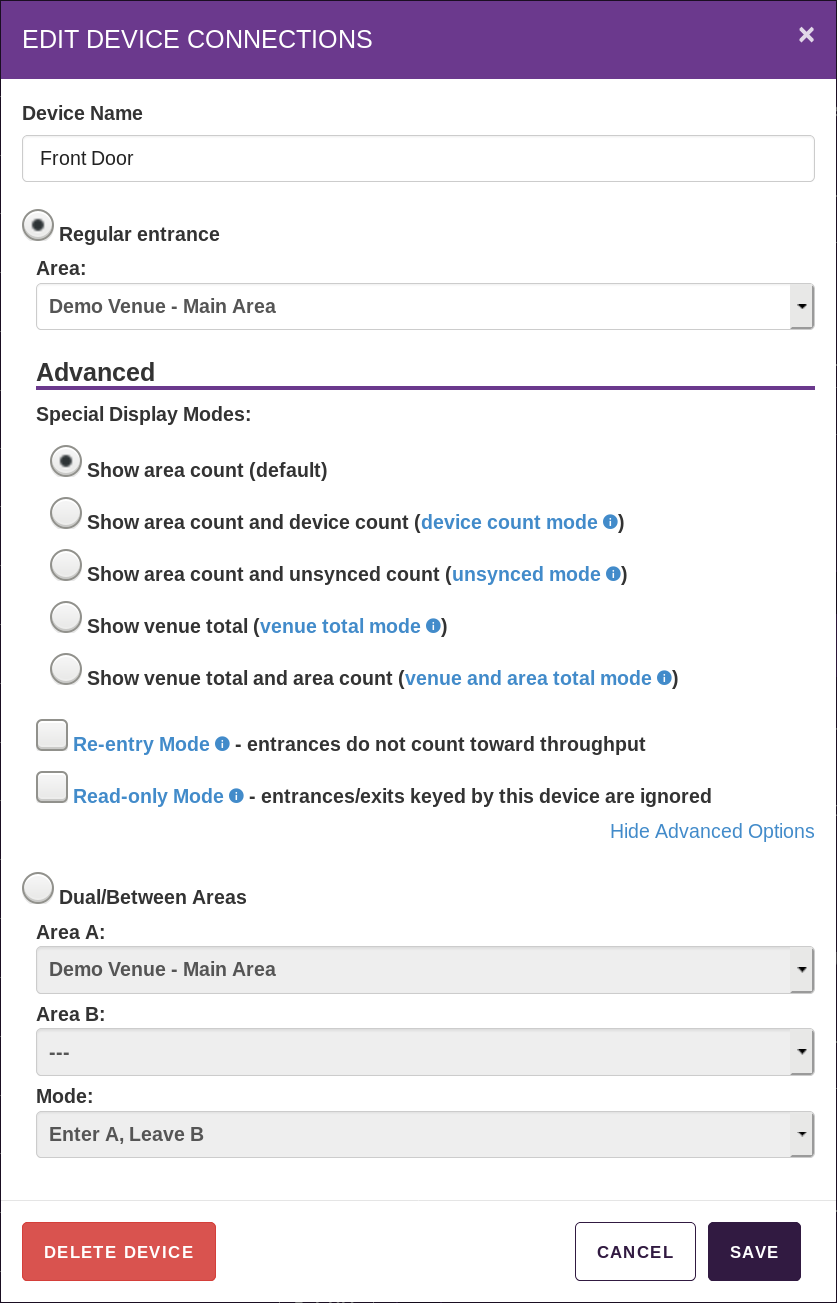
- Regular Entrance (Single paired area)
-
- Show Area Count (default)
- Single Count Mode: The device displays the count for the connected area only (not the venue total). Resetting the count (via menu) resets the count for the area to zero.
- Show Area Count and Device Count
- Split Count Mode: In some applications you want to know exactly how many people entered via a particular device. Typically, you can access that information from our online dashboard, but in some circumstances it would help to have that information displayed on the device. When in this mode, the device will show your current area count and the total count through that particular device since the last reset ("zero count" via device menu).
- Show Area Count and Unsynced Count
- Split Count Mode: When WiFi access is not reliable you can get into trouble. Unsynced mode makes it very clear how much data has yet to be synchronized with the central server. The on-screen display shows the last synchronized area count and the total number of in/out counts that have yet to be uploaded. When that count is zero, everything is fine - all the data has been synchronized with the server. If that count grows, say if WiFi has been interrupted, the counter operators can then be aware of how much their local count has changed and your team can fall back to alternate forms of communication (usually radios) to make sure you don't exceed your legal capacity.
- Show Venue Total
- Single Count Mode: The device displays the count for the entire venue (all combined areas). Resetting the count (via menu) resets the count for each of the connected areas to zero. You cannot use Venue Total mode with a "separate area".
- Show Venue Total and Area Count
- Split Count Mode: The device displays both the local area count, and the venue total count. If your venue is setup with multiple areas, it can be useful to see the combined total of all regular areas alongside the local total. Resetting the count (from the device via "Zero Count") resets the count for only the area which the device is directly connected.
In addition, there are two options that can be added to any of the above modes:
- Re-Entry Mode
- Some venues allow patrons to come and go at any time. Each subsequent entrance count towards your daily throughput, which means that if you were selling tickets, the number of tickets sold would no longer match your recorded throughput. Putting a device in 're-entry mode' allows you get around this issue - any entrances entered on a device in re-entry mode will not be counted toward the nightly throughput.
- Read-Only Mode
- Rather than use a cell phone or tablet logged into the TallyFi dashboard, some supervising staff prefer to keep a regular counter on their person throughout their workday to keep an eye on the current live total. "Read-only" mode allows them to do so without fear of accidental button presses. Any input data will not change the global total. On TF-1 devices, you may temporarily see the counts appear on the device, but once the device synchronizes with the server you'll see that those counts have actually been ignored. The exception is the 'reset count' function that is accessible via the menu - this continues to work from a read-only device, so the supervising staff can easily start each day with a return to zero.
- Two Different Areas (paired to two different areas)
-
- Internal Mode
- The device displays the total for two separate areas, pressing either up buttons will add +1 to both area counts. Useful in specific circumstances where you want to have people enter two areas with one button press. A lobby is a typical example: you want to track the occupancy of the lobby area in addition to the your main room. By using internal mode to count people into a 'lobby' and 'main room' at the same time you can keep track of the counts for the lobby area in isolation, without requiring a second person and device to keep track of the traffic between the lobby and main room.
- External Mode
- The device displays the total for two separate areas, pressing either up buttons will add +1 to one area and -1 to the other. This mode is used to track movement between two rooms. The device will indicate when either area goes over capacity, allowing the door-person to make decisions about allowing people to move between rooms without violating capacity requirements for either room.
Troubleshooting
When things stop working, it is important to work methodically to figure out what has gone wrong. Here are a few problem areas for you to start your investigation:
- WiFi
- Have the WiFi credentials changed? Try and connect to the access point from your phone with the same credentials, and visit TallyFi.com to verify that you have the right password and that the connection is working. We suggest temporarily disabling your cellular data connection to make sure you are actually testing the access point rather than your data plan. If everything appears to be working, we recommend using the AP mode setup configuration method and watching the connection process - if errors continue to occur, the AP setup process will detail them, and that should provide a starting point for further diagnosis. Another common issue is with the use of "captive portals" - access points that require the user to sign in via a webpage to access the wider Internet after having connected to the access point. Our device does not provide any support for captive portal logins - you'll want to whitelist each of the devices MAC on your access points to permit access. You can find the unique MAC address in the "Advanced" -> "Device Info" menu on the device.
- Bindings and Settings
- Device configuration can be tricky - if you've recently made any changes to device configuration, it is worth checking the dashboards settings to make sure you've configured the device to do what you want. Start with a simple configuration, and verify that your issue persists.
- Hardware Issues
- If the device appears to be unresponsive, plug it into the charger, and press the "reset" button on the back of the device using a paperclip or pen. If the device continues to be unresponsive (not displaying anything on screen), contact support.
Questions? We are here to help!
We will get back to you within 48 hours or less. Ask us anything!